
Needle Juniper Bonsai: The Japanese Mountain Classic That Tests Your Patience
The Tree That Humbled Me
In 2016, I thought I was getting pretty good at bonsai. I had successfully kept several junipers alive for a few years, my maples were thriving, and I was feeling confident. So when I saw a beautiful Needle Juniper (Juniperus rigida) at a bonsai show, I bought it without hesitation.
That tree humbled me quickly.
Within three months, half the foliage had turned brown. I panicked, tried to “fix” it with more water, more fertilizer, and more fussing. That made it worse. By the end of the first year, I had killed about 60% of the tree’s foliage through my well intentioned incompetence.
But here is the thing about Needle Juniper. If you stop trying to force it to do what you want and start listening to what it needs, the tree teaches you patience and observation like no other species. That half dead tree slowly recovered over the next two years. It taught me to slow down, watch carefully, and respect the tree’s pace.
Seven years later, that tree is now one of my most prized bonsai. It looks like an ancient mountain pine clinging to a rocky cliff. And I learned more from almost killing it than from any tree that came easily.
What is a Needle Juniper Bonsai?
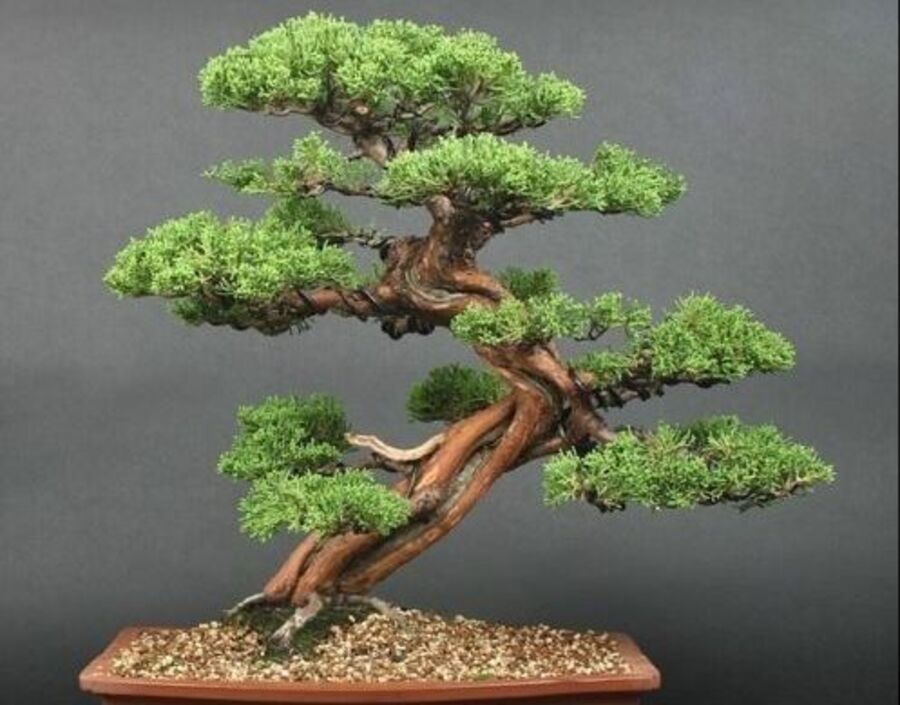
Needle Juniper (Juniperus rigida) is a species of juniper native to the mountains of Japan, Korea, and northern China. Unlike the more common Shimpaku Juniper with its scale like adult foliage, Needle Juniper keeps its needle like juvenile foliage throughout its life. These needles are sharp, pointy, and arranged in whorls of three around the branches.
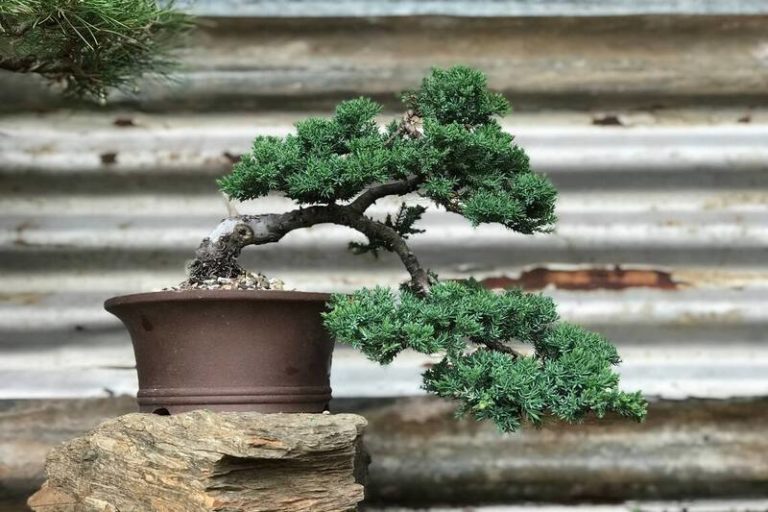
In nature, Needle Juniper grows in harsh mountain environments, often on rocky slopes and ridges where conditions are brutal. This harsh upbringing creates trees with incredible character: twisted trunks, dramatic deadwood, and dense, compact growth.
For bonsai, Needle Juniper represents the ultimate challenge for juniper enthusiasts. It has everything you want: spectacular natural deadwood, beautiful reddish brown bark that peels in strips, the ability to create ancient looking trees, and a natural growth habit that suggests windswept mountain environments. But it also has a reputation for being difficult, slow growing, and unforgiving of mistakes.
A Needle Juniper bonsai is essentially a miniature version of those tough mountain survivors. The sharp needles give the tree a wild, untamed appearance that is different from the refined cloud like pads of Shimpaku. The deadwood (jin and shari) is often extensive and dramatic. The overall aesthetic is rugged, ancient, and powerful.
History and Cultural Significance
Needle Juniper has been used in Japanese bonsai for centuries, though it has always been considered a more challenging and prestigious species than Shimpaku. In traditional Japanese bonsai aesthetics, Needle Juniper represents the harsh mountain environments of northern Japan: cold, windswept, and unforgiving.
The species became particularly prized during the Edo period (1603 to 1868) when bonsai cultivation became more sophisticated. Masters sought out yamadori (collected trees from mountains) that showed extreme character from decades or centuries of harsh conditions. These collected Needle Junipers often became treasured specimens, passed down through generations.
In modern bonsai, Needle Juniper is less commonly seen than Shimpaku, partly because it is more difficult to maintain and partly because quality material is harder to find. In Japan, spectacular yamadori Needle Junipers can sell for tens of thousands of dollars because of their rarity and the character they possess.
The species gained some recognition in the West starting in the 1980s and 1990s as American and European practitioners learned from Japanese masters. However, it remains relatively uncommon compared to other juniper species because of its reputation for difficulty.
I first learned about Needle Juniper from a Japanese bonsai master who visited my local club. He had a collected specimen that was over 300 years old, with a hollow trunk and massive deadwood features. He said it had been in his family for three generations. Looking at that tree, I understood why people become obsessed with this species.
What Makes Needle Juniper Special for Bonsai
After seven years working with this species (I currently have two trees), here is what I have learned:
Spectacular Natural Deadwood
This is the main attraction. Needle Juniper develops incredible natural deadwood in harsh growing conditions. The wood bleaches to a beautiful silver white, and the grain spirals dramatically. Combined with strips of living reddish bark, the contrast is stunning.
The deadwood also ages beautifully over time. Unlike some species where deadwood deteriorates, Needle Juniper deadwood becomes more refined and weathered looking with each passing year.
My older tree has about 40% natural deadwood that was already there when I bought it. I have done minimal carving, just cleaning and preserving what nature created.
Unique Needle Texture
The sharp, needle like foliage gives Needle Juniper a completely different aesthetic from scale foliaged junipers. It looks wilder, more primitive, more ancient. The needles are arranged in whorls of three, creating interesting texture and pattern.
The needles are also quite fine (about 0.5 to 1 inch long), so despite being needles rather than scales, they still work at bonsai scale.
Incredible Age Appearance
Even relatively young Needle Junipers can look ancient. The combination of peeling bark, dramatic deadwood, and dense needle masses creates an impression of great age. A 30 year old tree can look like it has been clinging to a mountain for centuries.
Natural Mountain Character
Needle Juniper just naturally looks like it belongs on a windswept mountain ridge. You do not have to work hard to create that aesthetic. The tree does most of the work for you if you let it express its natural character.
Long Term Beauty
These trees get better with age. The bark becomes more textured, the deadwood more refined, and the overall character more pronounced. A Needle Juniper is never truly “finished,” it just keeps improving over decades.
Challenges That Make It Special
I will be honest: Needle Juniper is not easy. It grows slowly. It does not back bud as readily as Shimpaku. The needles are sharp and unpleasant to work with. It is sensitive to certain conditions. But these challenges are also what makes successfully growing one so rewarding.
Types and Varieties of Needle Juniper
Needle Juniper has fewer cultivated varieties than Shimpaku, but there are some variations worth knowing:
Standard Needle Juniper (Juniperus rigida)
This is the species form, what you will typically find if you can find Needle Juniper at all. It has typical sharp needles, excellent deadwood characteristics, and all the features I have been describing.
Features: Sharp needles in whorls of three, reddish brown peeling bark, slow to moderate growth, excellent deadwood potential, very cold hardy.
Best for: Traditional bonsai styling, literati and windswept styles, anyone wanting the authentic mountain aesthetic.
This is what both of my trees are.
Needle Juniper from Different Regions
Trees from different parts of the native range (Japan vs Korea vs China) can show subtle differences in needle length, growth habit, and bark characteristics. Japanese material is generally considered the finest for bonsai.
Features: Varies by origin, but Japanese material typically has the finest needles and best bark quality.
Best for: Serious collectors and advanced practitioners.
Collected vs Nursery Grown
This is not a variety, but it is worth mentioning. Collected yamadori Needle Junipers from harsh mountain environments are vastly superior to nursery grown material in terms of character and presence. However, they are also much more expensive and challenging to establish.
Features of collected material: Incredible trunk movement, extensive natural deadwood, compact growth, immediate bonsai presence.
Features of nursery material: Straighter trunks, less deadwood, needs years of development, more affordable.
My older tree is collected material that was imported from Japan. My younger tree is nursery grown and is progressing nicely but will never have the character of the collected tree.
For beginners, I strongly recommend starting with nursery material to learn the species before investing in expensive collected trees.
How to Grow a Needle Juniper Bonsai
Let me walk you through what actually works, based on seven years of experience (including plenty of mistakes).
Getting Starting Material
Finding Needle Juniper can be challenging. It is not as common as Shimpaku or garden center junipers.
Option 1: Specialized Bonsai Nurseries
Some bonsai nurseries in the US and Europe import or grow Needle Juniper specifically for bonsai. This is your best option for quality material.
Good things: Already selected for bonsai characteristics, healthy and established, usually some development already done.
Bad things: Can be expensive ($100 to $500 or more), limited availability, may need to order online.
This is how I got both of my trees, from specialized importers.
Option 2: Imported Yamadori
High end bonsai dealers occasionally offer collected Needle Juniper from Japan or Korea. These are spectacular but very expensive.
Good things: Incredible character and presence, immediate bonsai quality.
Bad things: Very expensive ($1,000 to $10,000 plus), challenging to establish after import, requires advanced skills.
Only consider this if you have significant experience with junipers and the budget to risk expensive material.
Option 3: Growing from Seed or Cuttings
Needle Juniper can be grown from seed or rooted from cuttings, but this is a very long term project.
Good things: Affordable, maximum control from the beginning.
Bad things: Takes 15 to 20 years to develop anything resembling a bonsai, requires patience.
I started some cuttings three years ago as an experiment. They are still tiny. I will check back in 2035.
Option 4: Wild Collection
In some areas where Needle Juniper has naturalized, collection may be possible (always check legality first). However, Needle Juniper does not grow wild in most places outside its native range.
Soil Mix That Works
This is critical. Needle Juniper is very sensitive to soil conditions and needs excellent drainage.
My mix for established trees: 60% pumice, 30% akadama, 10% pine bark
For newly collected or recently repotted trees: 80% pumice, 20% pine bark (very fast draining for root recovery)
Key principle: Drainage is absolutely critical. Needle Juniper roots need oxygen and will rot quickly in heavy soil. Water should drain through the pot in seconds.
I lost significant root mass on my first tree by using soil with too much organic content (30%). The roots stayed too wet and began rotting. I had to emergency repot in summer (not ideal) to save the tree.
Location and Climate Needs
Needle Juniper is hardy but has specific preferences:
Sunlight: Full sun is essential. Minimum 6 hours, but 8 plus hours is ideal. Insufficient light causes weak, spindly growth and poor needle density.
Temperature: Hardy from zone 5 to zone 9. They can handle cold winters (down to about 0°F with protection) and warm summers. In very hot climates (zones 9 to 10), provide afternoon shade during extreme heat.
Winter Dormancy: Like all temperate junipers, Needle Juniper needs winter dormancy. They require cold temperatures for several weeks to rest properly.
Air Circulation: Critical. Needle Juniper needs excellent air flow to prevent fungal problems and maintain healthy foliage. Do not crowd them close to other trees or walls.
My trees stay outside year round in zone 7a on elevated benches where they get excellent air circulation. Winter temps occasionally hit 10°F, and summer can reach 100°F. They handle both extremes fine.
Watering Strategy
This is where many people struggle with Needle Juniper. The species is sensitive to both overwatering and underwatering.
My approach: Water thoroughly when the soil surface is dry and the soil 1 inch down is just barely moist (not wet, not completely dry, just barely moist). This is a narrower window than with Shimpaku.
In practice: In summer with my fast draining soil, this means watering once daily in morning. In spring and fall, every 2 days. In winter, once a week or less.
Signs of correct watering: Vibrant green needles, strong growth in season, no browning or yellowing, healthy root growth.
Signs of underwatering: Needle tips turn brown, foliage loses color and becomes dull, growth stops.
Signs of overwatering: Yellowing foliage, weak growth, root rot, fungal problems, entire sections turning brown.
The key lesson I learned: Needle Juniper wants consistent moisture but not wet conditions. Let the soil dry slightly between waterings, but do not let it get completely dry.
Fertilizing Schedule
Needle Juniper is not a heavy feeder. Over fertilizing causes problems.
My fertilizing program:
Spring (March to May): Balanced organic fertilizer (5 5 5 or similar) applied every 4 weeks
Summer (June to August): Continue balanced fertilizer every 4 to 6 weeks
Fall (September to October): One light application in early September
Winter (November to February): No fertilizer during dormancy
I use organic pellet fertilizer in very moderate amounts. Needle Juniper grows slowly and does not need aggressive feeding.
Mistake I made: My first year, I fertilized as heavily as I did with my Shimpaku junipers. The Needle Juniper responded with weak, elongated growth and poor needle density. Now I use about half as much fertilizer with much better results.
Pruning and Foliage Management
Needle Juniper requires different techniques than scale foliaged junipers.
Basic Pruning:
New growth appears as extending shoots from the needle masses. Unlike Shimpaku where you pinch soft growth, with Needle Juniper you let the growth extend and harden slightly, then carefully trim it.
Timing: Prune extending growth in late spring to early summer (May to June) after it begins to harden but before it becomes woody.
Technique: Use sharp scissors to trim back new growth to the desired length. Cut just above a whorl of needles so new buds can form.
Frequency: Check the tree every 3 to 4 weeks during growing season and prune as needed.
Important: Needle Juniper does not back bud as readily as Shimpaku. Never cut back to bare wood unless you are prepared to possibly lose that branch. Always leave some needles on every branch you want to keep alive.
Wiring Techniques
Needle Juniper branches wire well, but the needles make it challenging.
Wiring Guidelines:
Best timing: Fall through spring when growth is slow. Avoid wiring during active growth in late spring and summer.
Wire type: Aluminum wire for most work. The sharp needles make wiring unpleasant, so wear gloves.
Technique: Wire carefully, working around the needle whorls. Expect to get poked frequently. The needles are genuinely sharp. Use appropriate wire thickness.
Duration: Needle Juniper grows slowly, so wire can stay on longer than with fast growing species. Check every 3 months. Remove after 8 to 12 months typically.
Protection: The bark is relatively soft and will scar. Use raffia or tape under wire on important areas.
Practical tip: Accept that wiring Needle Juniper is uncomfortable. The needles will poke you constantly. Wear gloves, work slowly, and take breaks. I usually wire for 30 minutes, take a break, then continue.
Repotting Needs
Needle Juniper grows slowly and does not need frequent repotting.
Repotting Schedule:
Young trees (under 10 years): Every 3 to 4 years
Mature trees (10 to 30 years): Every 4 to 5 years
Old refined trees: Every 5 to 7 years
Best timing: Early spring just before new growth begins. In my climate (zone 7a), this is late March to early April.
Repotting Process:
Remove tree carefully from pot. Gently comb out outer roots with root hook. Trim circling roots and prune 20 to 30% of root mass (be conservative, Needle Juniper is sensitive to root work). Remove old soil from outer areas but leave soil core around trunk intact. Position in pot with fresh, very well draining soil. Water thoroughly. Keep in shade and protect from wind for 2 to 3 weeks.
Critical: Needle Juniper is much more sensitive to root work than Shimpaku. Be conservative. Never remove more than 30% of the root mass in one session. Give the tree a full year to recover before doing any aggressive styling.
I repotted my older tree too aggressively in year two (removed about 40% of roots). The tree survived but showed weak growth for the next two years. Lesson learned: Be gentle with roots.
Benefits of Growing Needle Juniper Bonsai
After seven years with this species, here is what I truly value:
Unmatched Character and Presence
When a Needle Juniper is well grown, it has a presence that few other species can match. The combination of dramatic deadwood, textured bark, and wild needle masses creates something genuinely special.
It Teaches Patience and Observation
Needle Juniper forces you to slow down. It does not respond to aggressive techniques or quick fixes. You have to watch carefully, respond to what the tree shows you, and work at the tree’s pace not yours.
This has made me a better bonsai practitioner overall. The patience I learned from Needle Juniper has improved my work with all my trees.
Long Term Satisfaction
These trees reward patience. Each year brings subtle improvements: the bark gets more textured, the deadwood more refined, the needle masses more dense. After seven years, my trees look significantly better than they did in year one.
Unique Aesthetic
Nobody else at my bonsai club has Needle Juniper. When I bring mine to shows, people stop and ask questions. It stands out because it is different from the common Shimpaku and garden center junipers everyone else has.
Mountain Tree Authenticity
If you want to create the impression of an ancient tree from a harsh mountain environment, Needle Juniper delivers that aesthetic more convincingly than almost any other species.
Year Round Interest
The evergreen foliage provides constant visual interest, and the deadwood creates drama in all seasons. In winter especially, when deciduous trees are bare, the Needle Juniper is still beautiful.
Styling and Design Philosophy
The best Needle Juniper bonsai I have seen share certain design principles:
Embrace the Deadwood
Needle Juniper is fundamentally about the balance between living foliage and dramatic deadwood. Do not try to create a “perfect” green tree. Showcase the deadwood. Let it be a major feature of the design.
My older tree is approximately 40% deadwood, and that is what makes it special.
Work with Natural Character
Collected Needle Junipers come with built in character from decades in harsh conditions. Your job is not to impose a design but to enhance what is already there.
Even with nursery material, look for the tree’s natural tendencies and work with them rather than against them.
Literati and Windswept Styles Are Natural
Needle Juniper looks most convincing in styles that suggest harsh mountain conditions: literati (bunjin), windswept (fukinagashi), slanting (shakan), or informal upright (moyogi) with significant movement.
Formal upright looks forced and unnatural on this species.
Keep Foliage Masses Dense but Wild
The needle masses should be dense enough to show health and vigor but retain a slightly wild, untamed quality. Perfect, symmetrical cloud pads look wrong on Needle Juniper.
I aim for dense, irregular masses that look like they have been shaped by wind and weather, not by precise human intervention.
Pot Selection
Needle Juniper looks best in unglazed pots in earth tones: browns, grays, tans. The rugged character of the tree clashes with refined glazed pots.
I use rough textured, unglazed brown pots for both my trees. The pots complement the mountain aesthetic without competing for attention.
Seasonal Care Guide
Spring (March to May)
Spring brings new growth and the main activity period.
Tasks: Repot if scheduled (early spring before growth), begin fertilizing when buds swell, check for winter damage, plan styling work, monitor for pests as weather warms.
What to expect: New growth emerges as light green shoots extending from needle masses. Growth is moderate, not explosive like with maples or Shimpaku.
Summer (June to August)
Active growth continues at moderate pace.
Tasks: Prune extending growth in early summer, water consistently (daily in hot weather), continue fertilizing, check for spider mites (they love hot dry conditions), protect from extreme heat if needed.
What to expect: Steady growth through early summer, then slowing in late summer heat. Needles should be healthy green. Watch for any browning which indicates problems.
Fall (September to November)
Growth slows significantly as dormancy approaches.
Tasks: Continue watering but reduce frequency as temperatures drop, final light fertilization in early September, clean any dead needles from interior, prepare for winter.
What to expect: Growth essentially stops by October. Needles may darken slightly in color. Tree is preparing for dormancy.
Winter (December to February)
Tree is dormant.
Tasks: Minimal watering (only to prevent complete drying), protect roots in zones 5 and colder (place on ground, mulch around pot), check for winter damage after storms, deadwood work can be done now, plan next year’s development.
What to expect: Tree looks dormant but healthy. Needles may bronze slightly in severe cold (this is normal and they will green up in spring).
Common Problems and Solutions
Browning Foliage
Causes: Overwatering, underwatering, root problems, or spider mites
Solution: Check soil moisture carefully. If too wet, reduce watering and check drainage. If too dry, water more consistently. Check for spider mites (tiny webs, stippled needles). If root problems suspected, carefully check roots, and if necessary, repot with fresh soil.
This is the most common problem with Needle Juniper. I have dealt with it multiple times, usually caused by watering issues.
Slow or No Growth
Causes: Insufficient light, poor soil conditions, root problems, or natural slow growth habit
Solution: Ensure full sun exposure. Check soil drainage. If tree has not been repotted in 5 plus years, consider repotting. Remember that Needle Juniper naturally grows slowly, slower than Shimpaku.
Poor Back Budding
Causes: Insufficient light to interior, natural characteristic of species, or tree weakness
Solution: Thin foliage to let light reach interior branches. Be patient, Needle Juniper back buds slowly. Maintain tree health through proper care. Never cut back to completely bare wood.
Spider Mites
Causes: Hot, dry conditions with insufficient air circulation
Solution: Spray undersides of needles with strong water stream weekly as prevention. Improve air circulation. Use horticultural oil or insecticidal soap if infestation occurs. In severe cases, use miticide.
I battle spider mites every summer on all my junipers. Weekly preventive spraying helps significantly.
Branch Die Back
Causes: Cutting back to bare wood, insufficient light, overwatering causing root rot, or branch weakness
Solution: Never cut branches back to areas with no needles. Ensure adequate light. Check watering practices. Sometimes you simply have to remove dead branches and work with what remains.
Yellowing Old Needles
Causes: Natural shedding (normal), or overwatering
Solution: Some interior needle yellowing and shedding is normal as the tree matures. Just remove the dead needles. If yellowing is extensive or affecting new growth, check for overwatering.
Needle Juniper Bonsai Care Sheet
| Aspect | Care Guidelines |
|---|---|
| Light | Full sun, minimum 6 hours daily. 8 plus hours ideal. Insufficient light causes weak growth. |
| Water | When soil surface dry and 1 inch down barely moist. Daily in summer, weekly in winter. Very critical. |
| Soil | Excellent drainage critical: 60% pumice, 30% akadama, 10% pine bark. Water must drain instantly. |
| Fertilizer | Light feeding: Balanced organic fertilizer every 4 to 6 weeks spring through summer. None in winter. |
| Temperature | Hardy zone 5 to 9. Handles cold to about 0°F and heat to 100°F with proper care. |
| Humidity | Tolerates range but prefers moderate humidity. Excellent air circulation critical. |
| Repotting | Every 3 to 4 years (young trees), 4 to 7 years (mature). Early spring. Be conservative with roots. |
| Pruning | Trim extending growth in late spring to early summer. Never cut back to bare wood. Slow careful work. |
| Wiring | Fall to spring best. Can stay on 8 to 12 months. Needles are sharp, wear gloves. |
| Pests | Spider mites in hot weather. Generally pest resistant. Good air flow prevents problems. |
| Winter Care | Hardy but protect roots in zones 5 and colder. Can stay outdoors with minimal protection. |
Who Should (and Should Not) Grow Needle Juniper
After seven years with this species, here is my honest assessment:
Needle Juniper is Great For:
Experienced juniper growers ready for a challenge, people who appreciate dramatic deadwood aesthetics, patient practitioners who enjoy slow long term development, cold climate growers (zones 5 to 8), anyone wanting unique mountain tree character, collectors interested in premium material.
Needle Juniper is NOT Great For:
Complete beginners (start with easier junipers first), impatient people wanting quick results, indoor bonsai enthusiasts (must be grown outdoors), tropical climate growers (zones 10 to 11, needs winter dormancy), people who dislike working around sharp needles, practitioners wanting easy low maintenance trees.
The Bottom Line
Needle Juniper is not for everyone. It requires patience, careful observation, and willingness to work at the tree’s pace. It grows slowly, requires excellent drainage, and does not forgive major mistakes as easily as Shimpaku.
But if you are willing to put in the effort and learn what this species needs, the rewards are substantial. A well grown Needle Juniper has character and presence that few other species can match.
My half dead tree from 2016 taught me more about bonsai than any tree that came easily. Seven years later, it is one of my most valued trees. The journey has been challenging, frustrating at times, but ultimately deeply satisfying.
Resources and Further Learning
Books: “The Japanese Way of the Artist” by H.F. Davey (philosophy applicable to challenging species), “Bonsai Techniques I and II” by John Naka (juniper techniques), “Bonsai Master Class” by Craig Coussins (includes Needle Juniper work).
Online Resources: Bonsai Mirai (Ryan Neil’s content on conifer care), Bonsai Empire (juniper care guides), Bonsai Nut forums (search “Juniperus rigida” for discussions), Japanese bonsai blogs (many feature Needle Juniper).
People to Follow: Japanese bonsai masters who specialize in collected conifers. Look for work featuring yamadori Needle Juniper at major exhibitions.
Where to See Examples: National Bonsai and Penjing Museum (Washington, DC), Pacific Bonsai Museum (Seattle), Kokufu-ten exhibition catalogs (Japan’s premier show), major regional shows.
Final Thoughts
That struggling tree from 2016 sits on my bench today. It is not perfect. It still shows some of the damage from my early mistakes. But it has recovered, grown stronger, and developed character that I could never have created intentionally.
Needle Juniper taught me that not all bonsai should come easily. Some trees are meant to challenge you, humble you, and force you to become a better practitioner.
Is it the right species for everyone? Absolutely not. It is slow, demanding, and unforgiving of careless mistakes.
Is it worth the effort for those willing to learn what it needs? Absolutely yes.
The character, the presence, the mountain tree authenticity you get from a well grown Needle Juniper cannot be replicated with easier species. It is unique.
If you have successfully grown other junipers and you want a species that will push you to the next level, Needle Juniper might be your next challenge.
Just be prepared for a tree that will test your patience, demand your attention, and ultimately teach you lessons that go far beyond bonsai technique.
That is the gift of Needle Juniper.
Frequently Asked Questions
Q: Where can I buy Needle Juniper for bonsai?
A: Needle Juniper is not commonly available. Try specialized bonsai nurseries that import Japanese material, online bonsai retailers (Evergreen Gardenworks, Stone Lantern), bonsai shows where vendors sell premium material, or directly from importers. Expect to pay $100 to $500 plus for quality material.
Q: Can I grow Needle Juniper bonsai indoors?
A: Absolutely not. Needle Juniper must be grown outdoors year round. It requires full sun, fresh air, and winter dormancy. Trying to keep it indoors will kill it within months. There are no exceptions to this rule.
Q: How long does it take to develop a Needle Juniper bonsai?
A: From young nursery material, expect 10 to 15 years for a decent looking bonsai. A truly refined tree takes 20 to 40 years or more. Collected yamadori can look impressive immediately but still needs years of refinement. Needle Juniper is a long term species.
Q: What is the difference between Needle Juniper and Shimpaku Juniper for bonsai?
A: Needle Juniper has sharp needle like foliage that stays juvenile throughout life, while Shimpaku has scale like adult foliage. Needle Juniper grows slower, is more difficult to maintain, back buds less readily, and has more dramatic deadwood potential. Shimpaku is easier, faster growing, and better for beginners. Both are excellent but suit different skill levels and aesthetics.
Q: Why does my Needle Juniper have brown foliage?
A: Most commonly from watering problems (too much or too little), spider mites, root problems, or stress. Check soil moisture carefully, look for spider mites (tiny webs), ensure excellent drainage, and verify the tree has good air circulation. Brown foliage can indicate serious problems that need immediate attention.
Q: How often should I water my Needle Juniper bonsai?
A: Water when soil surface is dry and soil 1 inch down is barely moist (not wet, not completely dry). In summer with fast draining soil, this usually means daily. Spring and fall every 2 days. Winter weekly or less. Needle Juniper is sensitive to both overwatering and underwatering.
Q: Can I do deadwood carving on Needle Juniper?
A: Yes, Needle Juniper is excellent for deadwood work. The wood is dense, carves well, and bleaches beautifully. Only do this on healthy, established trees. Use sharp carving tools, work slowly, and apply lime sulfur after carving to bleach and preserve the wood. This is advanced work best learned through workshops.
Q: Is Needle Juniper good for beginners?
A: No. Needle Juniper is recommended for intermediate to advanced practitioners who have successfully grown other junipers. Start with Shimpaku or garden center junipers, learn basic juniper care, then progress to Needle Juniper after 2 to 3 years of experience.
Q: Why is my Needle Juniper growing so slowly?
A: Slow growth is normal for this species. It grows significantly slower than Shimpaku or other common junipers. Ensure it has full sun, proper watering, good drainage, and moderate fertilizing. If growth is extremely slow or stopped, check for root problems or insufficient light.
Q: How do I protect Needle Juniper in winter?
A: In zones 6 to 9, minimal protection needed. In zones 5 and colder, place pot on ground, mulch around it, or move to unheated garage or cold frame during extreme cold (below 0°F). The foliage is hardy but protect the roots from sustained hard freezes.
Q: Can Needle Juniper be grown in hot climates?
A: It struggles in zones 9 and above. It can survive in zone 8 to 9 with afternoon shade during summer and careful attention to watering. In zones 10 to 11, it is not recommended as it needs winter dormancy with cold temperatures.
Q: Why is Needle Juniper more expensive than other junipers?
A: It is less commonly available, grows slower (takes longer to produce), is more difficult to maintain (higher loss rates for growers), and quality collected material is rare and highly prized. Premium specimens can cost thousands because of their rarity and character.
Q: How do I get Needle Juniper to back bud?
A: Ensure adequate light reaches interior branches (thin foliage to let light in), maintain tree health through proper care, be patient (it back buds slowly), and never cut back to areas with no needles. Needle Juniper back buds less readily than Shimpaku, so work with existing growth rather than expecting new buds on old wood.
Also Read: